The First Solo
|
|

In a pa22-160 on EDDP, Leipzig-Halle, Germany
|
Before taking off the first time, let us understand the extremes of
Aviation:
- An airplane is quite fragile and flies at
high speeds. Yet it is one of the safest forms of transport.
-
- Pilots must constantly follow rules and
procedures. Yet an airplane is a symbol of freedom.
-
- With a little training, flight a small
aircraft is easy. Yet
if a problem occurs, you must be able to resolve it in a few seconds.
-
- Many flight tutorials are written with a
lot of humor. Yet not taking flying seriously will bring you down to
earth prematurely.
The aircraft used in this tutorial is the "Cessna
172“.
This is the aircraft used in many real life flight schools and a great
airplane to fly. In addition the C172 in FlightGear is broadly equipped
with Communication and Navigation Radios. And also its performance data
are well known, see http://wiki.flightgear.org/index.php/C172.
All together that makes it an ideal Training Vehicle for us.
Prerequesite
It might not come to you as a total supprise, but before you start the
program, it must have been installed and functional. So let us check:
- If FlightGear is not yet installed:
- see the FlightGear "Download Central" and install as described there
- have a look into the part "Installation" for a detailed descriptions
- if you cannot find a Download-Version that fits your needs
- search in the WIKI for e.g. "installation" or "your OperatingSystem", or.. or.. (See the "search" inputfield in the left lower section of the WIKI-pages)
- or search (and maybe place a "cry for help") in the forums, see especially the "Support --> Installation" Sub-Forum
- If the installed FlighGear does not start like any other program in your system
A First Experiment
- Start FlightGear as usual in your OperatingSystem
- do not specify any special options
- and please do disconnect any joystick, if you have one (for our first test that may overwrite our actions by keyboard!)
- if you start FlightGear with FGrun (Wizard, GUI-Launcher) make sure the defined airport is "KSFO" and the aircraft is "C172p"
- otherwise just define in a command-line "$FG_PROG/fgfs"
- After that you should find yourselfe in
San-Francisco on the active runway in a Cessna c172p with a running
engine
- just waiting for you to push the throttle. Let us do exactly
that:
- If the engine is not yet running key "s"
- that should start it
- Press the key "PgUP▲“ and
keep it pressed a few seconds for "full throttle"
- If the Cessna does not start rolling release the parking-break by keying "B" (shift-b)
- And now hands off -- just watch! (Do not worry: I have payed an extremely
high insurance-policy for that experiment!)
 You should
notice: You should
notice:
The Cessna starts rolling
- turns more and more to the left
- the speed will rise and starts indicating in the
"Airspeed"-instrument (the
one at the upper left side of the instrument panel!)
- when entering the green markings in the
"Airspeed"-instrument the Cessna will Take Off
- and keep on turning to the left
- and finally will crash, as you see in the picture
|
- You can replay that crash again and again and study that
behavior. Try it now:
- Key "Ctrl+R" (Replay)
to watch what you did
- While the replay is running use "v“/"V“ and "x“/“X“ to
exercise different views
- Use "F10“to
show/no-show the menu-bar
- By hitting "F3" you
take a screenshot of any scene
you like and view and/or print it.
This is the very natural behavior for this "wild
beast"
-- when there is no tamer around! As a pilot (to be) you never should
forget this behavior - you will always find it, most distinct in
aircrafts with only one engine! (Technically: It results from the
unbalanced
torque-effect of the engine!). You must be prepared to
counterattack these "bad habits" vigorous - show that beast who is the
boss! We will learn to do that further down.
Now let us cancel this demonstration with "Menu → File
→ Quit“ - and see how it is done without paying that extremely
high insurance-policies each time!
Getting Serious
In the following we will do what a real instructor would do:
We will introduce you to the things you will need to know and operate
next. Most of that you will not have to read again for each start - at
best you make yourself a little "Checklist" what to check each time -
and save it for later use!
A "real instructor" would not just let you take the controls and fly --
he would first taxi to the runway, take off, climb and level off. Only
then he would "force" you to take over and start teaching you the level
"cruise" flight. Here in the simulator you have to do everything
yourself right from the start! That makes it quit difficult - but on
the other
hand you can train as often as you like, at any time you want - and do
not have to
pay for it! You even get some additional, "unrealistic" support - and
nobody is
there screaming hell at you (except yourself!)! And be sure: There were
others not as good as you -- even they made it!
For the beginning you should remember these keys:
- "p“ to take a short
nap
or read something again - but please never use it when flying in
"Multiplayer mode" with others -- because the Multiplayer server will
stop presenting your data to the world after you paused for some time
--
i.e. your friends do not see you any more - until you go on and reappear
somewhere
where nobody expects you - and of course in the midst of something that
just had been fine without you! Your friends might not like that
at all! But right now we do not
care, because we did not yet activate the "Multiplayer"-mode - thus
nobody is watching you!
- "Shift-Esc"
(== "File
→ Reset“) to restart the actual session again from the beginning
- "Ctrl-R"
(== "Menu
→ View
→ Instant Replay“) to watch what you have done good or bad!
- "Esc“ (== "Menu
→ Quit") to end the session
and save the last used options for the next start
If you have already a joystick (and know how to use it) you may use it
from
the beginning. But in the scope of this book, we will just describe (and
suggest for the beginning) the
usage of keyboard and mouse - the joystick (being it of whatever type
and
manufacturer and Operating-System etc.) you have to figure out yourself
(see Joystick in the part
"Briefing).
But you have to decide yourself about using Mouse or Keyboard - we will explain both!
My private suggestion is:
- For actions that need many fast controls you better take the
mouse (e.g. Taxiing, Take Off, Climb Out, Landing, Artistics, etc.).
- In somehow more stable conditions the keyboard has advantages,
because it is easier to dose the action and keep that until you take
it back on purpose (e.g. with the key "5"). Thus the keyboard fits best
during "cruise".
Preflight
This now will be our first actual usage of what we have learned
in the
preceding chapters. For the beginning we will keep it a little easier
by just using the Cessna like a car, i.e. only "2 dimensional"
right/left and forward (backward is a little unusual for a plane!)
The Location
Before we start let's get familiar with the area in which we will
fly our first training sessions - otherwise we might get lost pretty
soon. (That "we" was a little a
hoax: You will be alone on your flights -- but all my good wishes will
be with you!).
There are a lot of possibilities to explore the area in advance: If you
are
constantly connected to the Internet you might use my favorite "MPmap", or "ATLAS" if you just work locally, you
could also use normal street-maps, or
aviation maps, etc.
If you want to follow me in using the
MPmap just open http://mpmap01.flightgear.org and zoom and move as usual in Google (see
the vertical scale in the upper left corner, and move witch the mouse
while holding the left button pressed!):
 We
will start in the San-Francisco-Bay-Area because that area is included
in the basic FlightGear-Package. We will avoid the most busy "San
Francisco International“
(KSFO) airport - but start just opposite on the "Metro
Oakland International“ (KOAK) on Parkinglot "lighta11“. We
will start in the San-Francisco-Bay-Area because that area is included
in the basic FlightGear-Package. We will avoid the most busy "San
Francisco International“
(KSFO) airport - but start just opposite on the "Metro
Oakland International“ (KOAK) on Parkinglot "lighta11“.
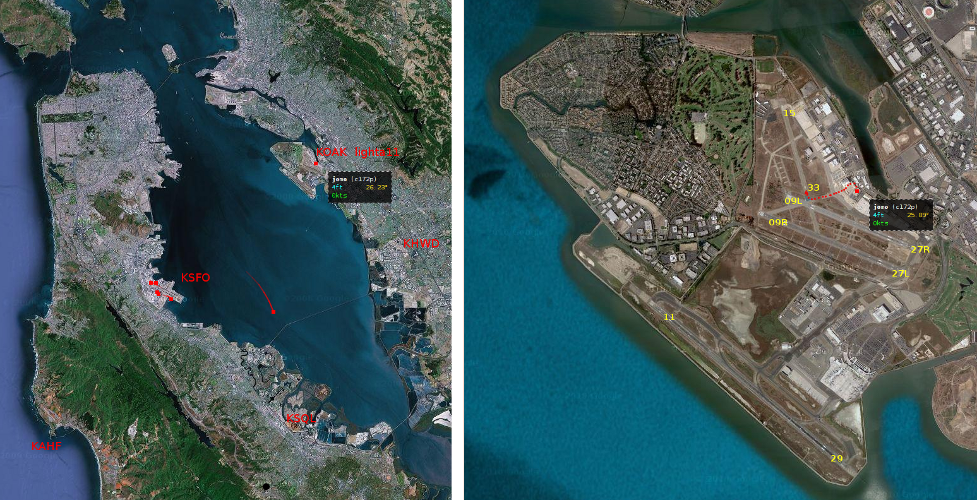
See in the left
picture the Bay-Area with the 5 airports (KOAK, KSFO, KHAF,
KSQL, KHWD). The little red dots are Multiplayer
aircraft that were active on a weekday at 9:00 local time - but only
one
is actually
flying now (the one over the Bay with the comet-tail). On the right side
you see the pilot "jomo" in his C172p, parking exactly were you will
start up soon!
You will also notice, that it is hardly possible to get lost in this
area: Wherever you are you can fly westward or eastward to find a
coastline having the water on its westward side - that line follow
north
or south - and you get home again. (At least you will find the "Golden
Gate Bridge" to be seen here in the very upper-left corner!)
The picture on
the right enlarges the airport-area with it's 5
runways (11/29, 09R/27L, 09L/27R, 15/33). Again you see "jomo" parking
there and you see a red dotted line from "jomo" to the runway "33":
That is the way you will have to taxi prior to take off! |
>Start the Simulator
There are many ways how
to start the simulator. Because we do not need lots of options for our
training, I would like to make sure that every trainee has the same
environment for these first flights. So we will
- start manual with a Command-Line
- in a C172p
- on the KOAK Parkinglot "light11"
- with coordinated
Aileron/Rudder
- and set the Parking Break, in order not to start rolling unwanted:
Just type into a Command-Line:
fgfs
--airport=KOAK --parkpos=lighta11 --enable-auto-coordination --prop:/controls/gear/brake-parking=1u
You may have to add
$FG_PROG/ in front of that line if you do not have a standard installation for your Operating-System!
Click onto the blue marked $FG_PROG to see what that label should be replaced with for your system!
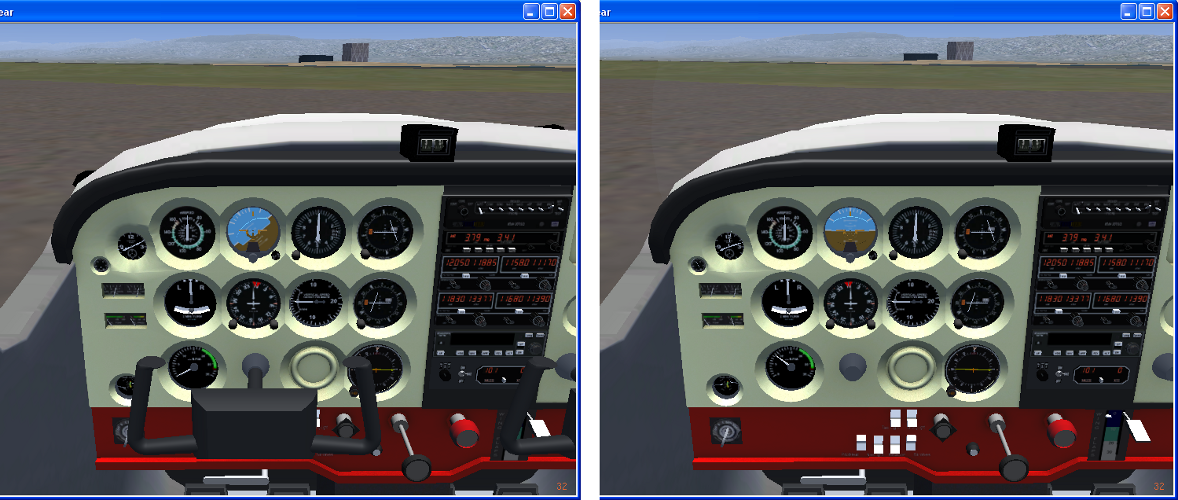
With that command we will get one of the above 2 pictures - at least
after we have done 3 improvements (if
needed):
- In case it is dark and you see hardly anything we will force
noon-time:
- Menu → Environment → Time Setting → Noon
- In order to have some nice weather for our first lessons we will
play "Petrus":
- Menu → Environment → Global Weather
- choose
as METAR-Source:
"Fair weather"
- In case you have opened the 2D-version (with rather different
instruments) let us change to 3D (so we all know what we are talking
about):
- Menu
→ View → Display Options:
- Deactivate the "Show
2D Panel"
- Click twice with the right mouse-button into the
FlightGear-window to change the mouse-pointer to "<=>". Now try
to achieve a picture like shown above (if you forgot how to: "Viewing
Mode → Mouse-Pointer"). After you got it, click once more
the right
mouse-button to lock that view (that
also should bring back your normal mouse-cursor).
- Now you should see which of the 2 pictures you have - and what
the differences are
- on the right there is missing the Yoke (at center bottom)
- and see the "Ignition Switch" and the "Electrical Switches"
that are/were hidden by the yoke.
- (You may remove the yoke by: "Menu →
Cessna C172P → Show/hide
yoke“).
- If
your engine is "running" let us switch it off
-
pull the red "Mixture" lever
completely out until the engine stops
(rotate the "Mouse-Wheel" over it)
-
then turn the "Ignition
Switch" to "off" (type several times "{").
- You should recognize (now, as in the left picture) that everything
is still switched "off",
you realize that
- the "RPM" is still at "0" (in the lower line of instruments on
the left)
- the "Attitude Indicator" is tilted (in the upper line of
instruments
in the center)
Check the Controls
- Orientation:
In the Simulator you have the possibility to jump outside
the
cockpit and check everything from the outside:
- "v“ beams you outside
(typing "v" twice will put you
into the "Chase View")
- 2 clicks
with the right mouse-button switches into the "View Mode" (<=>) - moving the mouse now
enables you to evaluate the surroundings
- rolling
the mouse-wheel zooms you in/out
- Try to get
the following picture (without
the red numbers 1 and 2):
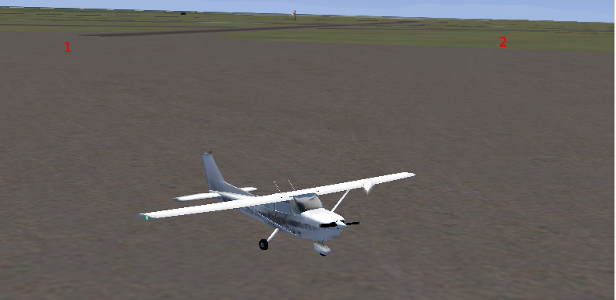
Do you remember the picture of the Bay-Area
at the beginning? In the right picture there was shown the way to
runway 33. According to that:
- you at first have to make a U-Turn (180°) and taxi to the
red marked 1
- from there we follow the taxiway to the right
- turning then right again at the next taxiway-crossing leads us to
the runway 33 at 2.
Keying in "V"
(may need multiple times!) should return you to the primary "Cockpit View".
But take some time now to switch through all the views by keying
"v" and/or "V" several
times! See "menu →
View → View
Options" for all views being available (and active!) .
|
- Test the
Controls: When you watched planes at airports getting ready
to start - you will notice that also those are doing exactly that
(parts of it often during taxiing) – so it might be better to do
it now also in a simulator, instead of waiting till some others are
watching and laughing about any mishaps. Anyhow: It is good to know
what
is doing what:
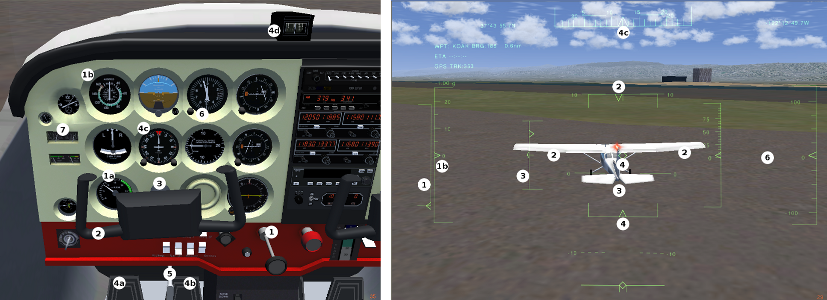
Test
the Control Elements: Switch between the sights with "v/V", activate the HUD with
"h" (try to key "h" a couple of times and
watch!))
In the following "Mouse +" means: Click the right mouse-button till
the courser is a cross-hair (+),
indicating the "Control-Mode"!
- Throttle: This
we can test only after we started the engine (see next chapter) and are
moving (taxiing or flying). But we should familiarize ourself with the
controls and the indications:
- Mouse
normal:
move the mouse over the throttle and rotate the mouse-wheel
- Keyboard: PgUp▲
/ PgDn▼ (or 9/3)
- (1) The Throttle should
move in/out -- in the HUD up/down
- (1a) The RPM
should indicate more/less (only when
the engine is running)
- (1b) The Airspeed indicates the IAS
when taxiing or flying
- Aileron: (Remember:
We "auto-coordinated" the ailerons and rudder - so both will move now
the same time! See also item 4!)
- Mouse +: Move the
mouse left/right
- Keyboard: "←/→“ (or "4/6“)
- The yoke should move like a steering wheel
- In the HUD you see the ailerons moving themselves - and
above you see the deviation from neutral
- (4c) The Compass finally will show the resulting change in heading
(when
flying)
- Elevator:
- Mouse +: move the
mouse
backward/forward
- Keyboard: "↑/↓“ (or
“2/8“)
- The yoke should move in/out
- In the HUD you see the elevators moving up/down - and left
of it the deviation from neutral
- Rudder: (Remember:
We "auto-coordinated" the ailerons and rudder within the start-command
- so both will move now
the same time! See also item 2!)
- Mouse +:
Keep the left mouse-button pressed while moving the mouse left/right
- Keyboard: "Insert/Enter“
- (4a/4b) Watch the foot-pedals moving
- In the HUD you see the rudder moving left/right - and below
of it the deviation from neutral
- (4c) The Compass finally will show the resulting change in course (when
flying)
- Breaks:
As
in automobiles there are 2 independent breaks in an aircraft:
- The
normal breaks work while activating the upper part of the
rudder-(foot)-pedals
- The parking-break is set/reset with a
hand-lever.
- All breaks work on the 2 main-wheels, separate for
the left and right wheels - thus you can turn on ground with breaking
left or right (that we call "differential breaking").
- Watch it: That simulated breaking is just "full break" or
"nothing", thus I suggest you use them in a stuttering fashion:
On Off On Off ...!
- Mouse: There
is no direct means to operate the normal breaks with the mouse!
- The parking-break you set/reset by clicking onto the lever
(5).
- Keyboard: You break on
both wheels with "b", if you
want to break only on one side, you use "."/","
(dot/comma). Watch the foot-pedals (4a and 4b) moving in the upper
part, i.e. in reality you break by tilting your toes only!
- For the parking-break use "B" (shift+b)
- Altimeter: Do not forget
to set the
altimeter to the altitude of the airport–
otherwise you will never know what altitude you really fly at - that
would turn out pretty bad during landings! Use the rotary button in the
left
lower corner of the instrument to set it.
In
the
HUD you see 2 altitudes: In the big scale on the very right side
you see the normal "altitude above sea-level" - to its left the "altitude above
ground".
On KOAK you will not really see a difference (it is 9 feet!) - but fly over a mountain
then you will notice it!
- Heading
(4c): We always know the heading we will fly directly
after TakeOff: It usually is the runway heading, i.e. for our first
flights 330°! So set the red marker inside the scale of the Directional Gyro to 33, by
clicking left/right of the little knob just on the right below the
instrument.
- Fuel: And
of course you should check if you have enough fuel! For this first
training that might not really matter - but later on, for longer
trips or when you stay in pattern for some time, that may become
critical! So make it a habit to check it prior to any start - unless
you
want to become the clown that everybody laughs about!
- Elevator
Trim: Check
the big black wheel in the center below the instrument-panel: Make
sure it is set for "Take Off". That again is not very important now
because it was set correctly during start-up -- but when you start again
after a landing then that item becomes crucial! If the trimming
is
not reseted after landing you might be certain that you crash very
shortly after Take Off. So again: Make it a habit to check it each time!
Getting Ready
Start
Your Engines
In our Cessna you can start your engine 2 ways:
- you just type "s" - that will
start it the quick and dirty way!
- or you do it the "realistic way",
for that see that chapter in
the part "know How"
Choose either one (for now!)
"Cleared to taxi to
runway 33“
Because there is no real ATC available right now, we can give that
clearance ourself!
Remember
the little trick: If you cannot read as fast as the plane reacts: Use
the little key "p"!
- Release the
Parking-Brake (see above: "B“ or mouse-click
onto the lever)
- Straight
ahead: Just push in the
Throttle a little bit to reach about 1000 RPM
in the Tachometer (remember: indicated 10 * 100 = 1000 RPM):
- Watch your speed: It should not get faster than about 10 kn (at
least for the beginning). Because that low speed is not really readable
from the
normal Airspeed-indicator you may use the HUD
(h), even
if that is not really realistic for the Cessna!
- Also not really close to reality you might use "v/V" to jump
outside and get a better view at where we are and what we are doing!
- If the speed gets drastically out of control use the break:
stuttering "b"
- Turns: Because
we used the option --enable-auto-coordination
on
start-up, moving the ailerons now will also move the rudder and thus the
front-wheel (while on ground). So we can turn like in a car: Turn
the Yoke left turns us left, and reverse. If we need a more narrow turn
we can apply some "differential breaking" ("."/",") in addition.
- Mouse +:
Move the mouse left/right
- Keyboard: "←"/"→"
Watch your speed especially while
turning:
>> going too fast will
flip you over sidewards
>> going too slow
might bring you to a full stop - you then might need a little more RPM (and
may be less stuttering breaking!)
>> especially in this situation you better never apply full breaks -
just "stutter"!
Now have fun in your "auto-scooter":
- Turn left till the "Heading Indicator" points to about 210°.
- I suggest you try that a couple of times to get some feeling
for it. Exercise it on the apron and try to follow a few taxi-ways on their
center-line!
- Watch your speed all the time! (May be you should use the HUD
for that!)
- At marker "1" follow the taxiway to the
right and take the next crossing taxiway to the right (to "2").
- Before entering the runway you have to stop at the so called
"Holding Point". That point is outside the runway, located such that
the landing/departing traffic is not disturbed. Usually there is a
white stop-line
with red signs on each side.
- On "controlled" airports you must stop here, report to ATC "yourName
at holdingpoint runway 33" and wait for the clearance from ATC.
- On "non-controlled" airports you check that there is no landing
traffic - then, and only then, you continue rolling onto the runway.
- Line up your Cessna on the centerline in the direction of the
runway
- apply the parking-break (B)
- and double check
- enough fuel
- altimeter = altitude of airport (KOAK = 9 ft)
- runway-heading, red bug in the "Heading Indicator" set to 330°
- set trim to "Take Off" position
- no flaps
- Then report to ATC (or
yourself, if no ATC is available): "myName ready
for departure on runway 33"
Fly
Climb Out
Well now: Let us try something a car cannot do (intentionally!):
We will now use the 3rd dimension! Do not be ashamed if that does not
work out perfect that very first time - if you get up to an altitude
of 2000 ft without crashing I will be satisfied. After that you have
lots of time to exercise! So:
- TakeOff: Apply
full throttle and try holding the
direction with the yoke/aileron (mouse left/right or "←"/"→") - watch the "red bug" inside the heading indicator (remember? We did set it to 330°!)
- remember our first exercise with that "wild beast": You will
need to steer a little to the right rather soon!
- remember that we coordinated Aileron and Rudder - so we can
steer with the Yoke - as long as we are on ground that even controls
the front-wheel! (For other
models it might be necessary to use some "differential breaking"!)
- When the Airspeed gets into the green scale-marking (~55 kn) we will
start to pull the yoke just a little (mouse backward or "↑/↓“) (or wait a little longer: Remember our
first experiment? The Cessna will lift off all by itself - just a
little later!).
- Fly just a few feet above the runway (or do a very shallow
climb) until the speed gets up to ~70 kn
- Keep the heading 330°
- Climbing:Maintain
the speed between 70-80 kn by pulling/releasing the joke - but
use only very small corrections! With the initial trimming the Cessna
will climb wonderful with full throttle at about 70kn - if you do not
disturb her! So you may from time to time just release the yoke, loosen
your mussels, and then again support your beloved Cessna with small
corrections!
- The most important rule is now: Do not chase the
instruments! Instruments only show the situation as it was some
time (seconds?) ago!
And Mr. Einstein made already the discovery: "You cannot change the
past" - so
do not try it! Seriously: You will never achieve a steady flight if you
react to each instrument-deviation "with the full power of the yoke"!
That way you will just chase things of the past → you overreact → thus getting into a dangerous,
constantly increasing back and forth - until you crash!
- Start with very modest corrective actions and watch what
happens - and only increase those actions if really needed. Rather hang
a
little low or high or left or right - we are not in a beauty contest!
- The only "truly real time" indication of the aircraft-attitude
is the horizon! So
- fly by aiming with the nose towards a certain point at the
horizon
- from time to time verify on the instruments that they are in
a tolerable range
- if needed change your point you aim for: A little
higher/lower, left/right, ...
- AFTER A WHILE verify on the instruments the results
- etc.
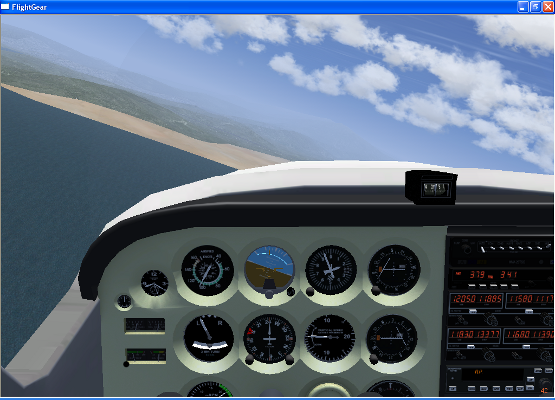
It should look like:

|
See
the nose just a little above the horizon, and just a thumb left of the
houses (or following
the coast-line). You even notice a slight horizontal tilt (as in that picture!) easier
when watching the
horizon, than on the instruments!! Who cares
for now that the speed is a little high? We are not judged (yet) by
achieving the best performance!
So: Fly by
the horizon and use the instruments to verify the achievements over
time! If needed set yourself a new target at the horizon (or something
above or below or left or right)!
- To
control the speed: Raising the nose will increase the rate of
climb and thus reduce the speed -- and reverse. (Did you notice that I said "control the Speed"? Speed is the critical value for holding
you in the air - so watch that!! Just vary the rate of climb to hold
the speed - who cares how fast you climb or sink
right now!?!)
- Mouse
+: push the mouse forward to
increase - pull backward to reduce the speed
- Keyboard: "↑“
increases, "↓“ reduces the speed
- To
control the direction:
- Mouse
+: move left/right
- Keyboard: "←“ / "→
|
Let us continue to climb to our cruising altitude of 2000 ft - and do not
forget the heading: It should stay on 330° !
Cruise
 About
100 ft below the planned 2000 ft we start leveling off:
About
100 ft below the planned 2000 ft we start leveling off:
Getting horizontal:
Push the nose down gently, till
>> the little dot-symbol in the center of the "Attitude Indicator" is leveled with the
horizon
>> and/or the rhombus in the HUD levels with the 0-line
The Cessna will not really like that and fight against it. You really
have to force it - and apply more force the faster we become.
Hold the attitude leveled with the horizon!
Now watch the "Vertical
Speed":
That needle should move from pointing upward to the horizontal position
and
remain there. But careful: Especially that instrument indicates
very delayed - double-check that indication against the indication
of
the altimeter, that should remain at 2000 ft. And again: As soon as you
are getting close to the attitude for the level flight return to the
method:
Do not chase the needle
- but aim towards a point in the distance!
Airspeed: Till
now the speed has been between 70-80 kn - now let it raise to about 110
kn. When reaching that 110 kn (and not before that!) we reduce the RPM
to 2500. That will balance the speed at about 120 kn.
Trimming: You
will have noticed that you need to apply more and more force to hold
the horizon in that position. The reason for that we know already!
Remember? While climbing we regulated the speed by
increasing/decreasing
the rate of climb! Now we do the reverse: The more we take away the
climbing the more we enforce an increase in speed - that again tries to
enforce an increase in climb. So let us use that wonderful big black
wheel on the center
pedestal below the instrument-panel. Rotate it upward until you do not
have
to push the yoke any more (or use key 7/1)! You
probably will have to regulate a little back
and forth until the Cessna truly stays leveled at that altitude!
Heading: You
probably have noticed that it becomes much easer now to hold the
heading - so lets delegate that work completely to the keyboard, and
trim the rudder with 0/Enter
Take your time to trim the aircraft to a "best can do" straight and
level flight. You might not be able to trim it by the trim-wheel a
100%. Do the very last piece "to perfect" with the RPM! Yes: Just
change
the RPM a very tiny little bit will help! Your Cessna should stay
stable
then
for at least a minute (on a beautiful day like today!). And that is a
good time to adjust that little plane-symbol inside the "Attitude
Indicator": Turn the button underneath the instrument to adjust that
little symbol with the horizon - so we always know what is "level
flight"!
Now I am curious:
Are you as confused as I (was some time ago)? Is that really true:
- Trimming the elevator (i.e. change the pitch) changes the speed?
- And changing the RPM results in climb/sink ?
Do you really believe that? Lets try it:
Practice
Let us do those tests, after
having trimmed the Cessna (at 2000 ft with 2500 RPM at ~120
kn) - good enough to be able to leave the hands (and feet) off the
controls (for a short while):
- Change the
RPM from 2500 up to 2700 RPM (do
not change anything else (except may be the throttle in order to keep
the RPM stable at 2700): You then should notice
- the speed will rise (as expected!)
- then we start climbing
- that reduces the speed again
- after some time we will level at a constant climbing with the previous
speed (~120 kn) !!
- let us climb to 3000 ft that way - then we just reduce the RPM
again to 2500 and thus leveling off (after some time)
- then try the reverse: Set the RPM to 2300 and watch that nice
sinking at constant speed!!
- >> results in
climbing/sinking!!
- Rotate the
Trim-Wheel some notches towards you (do not change anything else (except to
keep the RPM stable at 2700)): You should notice:
- we will start climbing
- that reduces the speed
- that will stop the climbing
- after some time we will be on a leveled flight with reduced
speed!!
- then let us try the reverse: Turn the trim forward some notches
and we end up flying faster at a constant altitude!!
- >> results in
changing the speed!!
Just do that a couple of times (until you believe it) - and then never
ever forget it again, because:
Exactly
that is the secret for a good landing!
Very often you will see that "pilots" approach the runway too
high or too low and then try to adjust that using the elevators!!
There is nothing worse
that you can do!!
- "Pulling it up" will decrease the speed → you probably will stall
prior to reaching the runway!
- "Pushing it down" will definitely increase the speed → which
makes settling down on the runway just about impossible, most people
then will force it down and end up underneath the runway! The speed is
the most
critical while landing - so you control your
sinkrate by changing the
RPM!! Even
though it always takes some time to see the results! Just try to react
very soon and with the least possible changes! Think ahead!
Now you should have learned and never ever forget:
The speed is the most
critical while landing
so
you control your sinkrate by changing the
RPM!!
That is unbelievable -- but true !
|
Turns
If we would have enough fuel and time we could just continue
cruising straight ahead and come back to KOAK sometime, after having
circled the earth. But most people prefer to turn back to the airport
and land
after a reasonable time. So let us try that:
The principle is very easy:
>> bank to the right and we will turn right
>> bank to the left and we will turn left
But actually we do need 3 controls for it:
- the ailerons to initiate the banking and thus the turning
- the rudder will balance the different drag of the 2
wings, caused by the ailerons moving opposite to each other
- the elevator to add lift which we loose because of that
banking
You will learn more about the relation of those 3 in the chapter "Turns"
under "KnowHow". For now let us be grateful for having "auto
coordinated" aileron and rudder
within the start-command! And the elevator we will use only as we did
all
the time: Keeping the altitude! So for now we might not win a beauty
contest - but we get back to the airport that way!
So: What is new and difficult about turns? We did that already all
the time (automatically) when holding heading and altitude! The new
thing is only to do it controlled and over a longer timeframe!
 To
control the turn we will use the "Turn Coordinator". In that newer Version (left) we have again a
little aircraft - but this one is specialized to watch our turns: To
control the turn we will use the "Turn Coordinator". In that newer Version (left) we have again a
little aircraft - but this one is specialized to watch our turns:
- The instrument will show us our "banking to the
side". If we hold the wing/needle on the first
mark we do a "standard turn" that completes a full circle (360°) in 2
Minutes!
- The
little ball below it tells us how well coordinated that turn is: It
should stay in the center - otherwise we slip to the outside or inside.
For
those first exercises let us not worry about the little "ball-leveler"
below it: We do not want to win a beauty contest (yet)!
But during the turn try to keep the little plan with its wings exactly
on
that mark (with the ailerons) and hold the altitude (with the elevator)
|
- So let us bank to the left as shown in the picture - and try to
stay in that attitude for 1 Min,
using the ailerons and elevator! (get the Stopwatch out of menu
→ Equipment →
Stopwatch)
- then go back into level flight and correct your altitude
- and then do the same exercise to the left
- etc.
And again: Do not chase the needle
- but watch the nose at the horizon!
When you are satisfied with yourself at this exercise, let us do a last
test:
>> fly straight and leveled
>> set your red bug in the "Heading Indicator" onto the present heading
(i.e. exactly on the top-edge of the scale)
>> start the stopwatch
>> and start turning until you are on the same heading again
>> stop the timer
What was the time?
It should be close to 2 minutes! By the way: Theoretically that
is always 2 min
at that banking, independent of the speed. If the speed is higher the
radius and thus the circumference and thus the way to be flown will
enlarge, resulting in the same time
for a complete circle!
Well now: Only the Autopilot will hit that exact time - but the closer
you get to that 2 min., the closer you are to being perfect in
controlled circling! We will learn some more about
"turns" later in the part "KnowHow"!
Landing
Landings are by far the most critical and most complicated task of all!
But you learned already how to control your Cessna and I have found a
nice spot with fitting landmarks -- so we will mange this. Just a formal hint: According to standards
the "Pattern" to a runway usually is left (i.e. the pilot always sees the runway
best from his left pilot-seat)
- but it may be right for several reasons. We did get approval for the
right pattern, because otherwise we would disturb the other traffic at
KOAK!
See the picture:
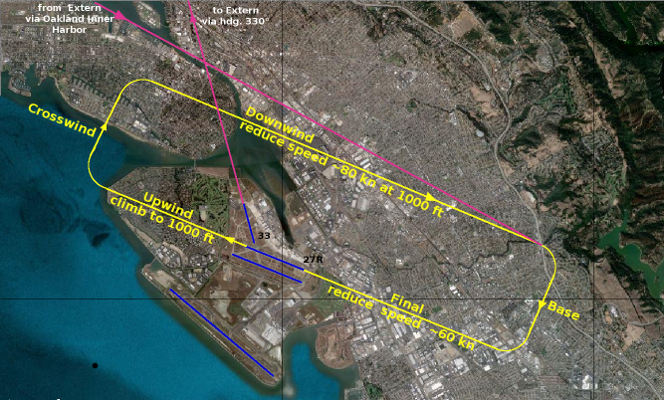
We will fly back again to KOAK, where we started from on that pink line
"to Extern", just leaving to the north (on 330° heading, do you
remember?!).
We come back just left of that one on the other pink line "from Extern"
entering the so called Downwind, at the
usual pattern-altitude of 800-1000 ft above ground.
At an easy to spot landmark we will turn right 90° to Base.
Finally we will turn another 90° to "Final",
descending very smoothly to the threshold of runway 27R.
If you then want to exercise you may do so by taking off on 27R,
following
"Upwind",
turning to "Crosswind"
and then continue with "Downwind" as we did before.
You also could, just after landing on 27R take a shortcut to the 33,
start from there and directly join into "Downwind". (That would not be
an officially approved procedure - but is nice and handy!)
|
Let's do it: Of course I do not know exactly where you are right
now - but I assume you just come back from the exercises we did before,
so you should be somewhere north of the airport - coming well trimmed
downward the eastern lake-shore to
the Bay Bridge at an altitude of 2000 ft and 2500 RPM and thus a speed
of ~120 kts:
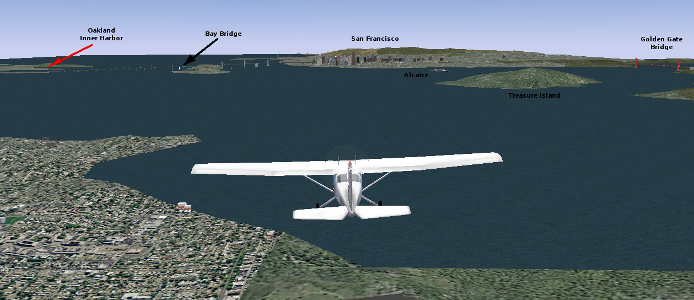
So you should find the position as shown in the picture. There you
decide, if you
- first do a
little sightseeing tour
- on the way you could stop for a cup of coffee in "Alcatraz"
- towards the entrance of the "Oakland Inner Harbor"
In any case you will meet me again at the entrance to the "Oakland Inner
Harbor", following that "Harbor-waterway" southeast towards the
harbor and then the airport:
|
- Over the "Oakland Inner Harbor" we
descent to and maintain 1000 ft
- as
soon as you turn into that waterway reduce the RPM by 100 (to 2400)
- the
speed will first drop, then the descent will start and the speed
returns to cruise-speed
- you
will be descending at about 500 ft/min (i.e you need 2 min down to 1000
ft)
- at
about 1100 ft increase the RPM again by 100 (to 2500), that will
initiate again the level flight at current speed
- you
should NOT need to use any other changes and/or trimmings! (Except maybe the Throttle to keep the RPM stable!)
- Merge into the "Downwind“
The"Downwind" is parallel to the runway
we want to land on, in reverse direction and 800-1000 ft above ground.
We will stay at the upper limit: 1000 ft.
We want to land on 27R (the right
one
of the 2 parallel runways heading 270°), so we set the "heading-bug"
(the red marker inside the compass dial) to 270. Now we can just fly by
that bug till the final landing without thinking, calculating, or
whatever:
- the now "Downwind“
is the reverse of
the runway - so keep the bug at the vertically lowest point
- later on "Base“
(90° to runway) we follow it horizontally at the extreme right side
- and last but not least on "Final“: we have
the bug as usual at the top!
 Just
before the end of the harbor turn to the downwind-heading 090° (the red
bug all the
way down). At that point we will start to aim towards the valley marked
"Flugrichtung". When we are about 90° besides the center of the runway, we start to reduce our Speed: Just
before the end of the harbor turn to the downwind-heading 090° (the red
bug all the
way down). At that point we will start to aim towards the valley marked
"Flugrichtung". When we are about 90° besides the center of the runway, we start to reduce our Speed:
reduce the RPM to 2000
and trim new for a level flight
- constantly trim the Cessna to maintain the altitude
1000ft
- that will reduce the speed to our approach-speed 80-90 kn
- at a speed just below 100 kn (white
area) we will get the Flaps to stage 1 with "]"
- watch the RPM and make sure it stays on 2000 (it tends to drop - so use the throttle to
adjust)
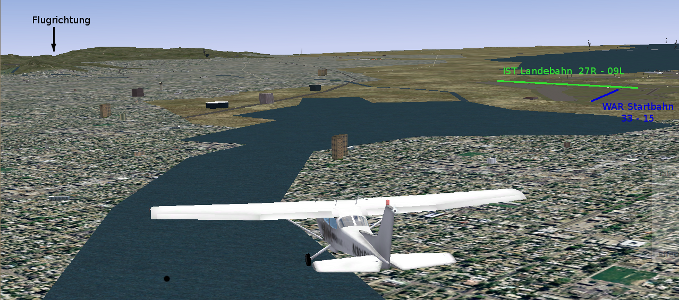
Keep the heading towards the valley
"Flugrichting" until :
|
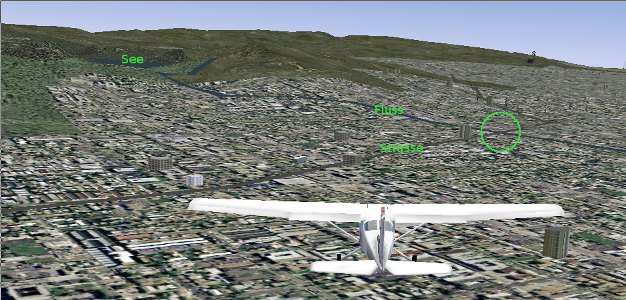
Where
there was only the valley we now see a lake ("See"). From there is
coming a river ("Fluss") crossing the highway ("Strasse") in front of
us.
- At that "Fluss/Strasse" crossing we turn base - i.e. the
red bug pointing to the right!
- If you look to the
airport just before turning, you see that the runway is
behind you at about 45°. That matches the normal definition for that
"point to turn to Base: ", i.e.
-
"If
you see the runway in 45° behind you → turn to base"!
- That is not
really a very precise method - but it works since about 100 years!
- As soon as you are
on Base look to your right: You should see the runway in some
kind of an angle to you. Shortly before you are crossing the
prolonged centerline of the runway 27R turn to Final!
|
- Turn to "Final“
- turn right to 270° (=
runway-heading = red bug all the way on top)
- reduce the RPM
to 1500 and set the Flaps to stage 2 (one more key "]")
- correct your flightpath according to the centerline of the
runway!
- do not keep your eyes at the threshold of the runway - but
rather to the
end of it! That way you can estimate much better when you are aligned
with the runway and also to see if you are high or low. If you follow
that method, you will (after some more landings) automatically adjust
your approach! (Maybe that
"automatic" was a little exaggerated - but
believe me: It helps! It just needs a little training!)
- on the last third of that final we set the Flaps to full
(another "]")
- that will bring down the speed to about 60 kn
- and now
it becomes critical: You are very close to stall!
- check the speed every 2 seconds!!!
- control the "rate of sink" strictly with the
THROTTLE - NOT the ELEVATOR!
- if
you are too high: Pull the throttle a little (remember above over the
harbor: -100 RPM makes you sink 500 feet/minute) --
without changing the
speed!!
- if you are too low: Slowly push the throttle in a piece
- thus climbing (i.e. reducing the sinkrate) without changing the
speed!!
- avoid using the elevator at all - that would just destroy
your wonderful approach-speed - and thus you get into a
constant up and down - ending far above the runway or below it!
Then you better go around and have a new try!
I know: That needs some
thinking ahead and some patience -- but you will learn that by training!
- Touch Down
- You should know: A perfect Touchdown is
a Stall 1 inch above ground !
- At about 3 feet above ground (which hopefully is the runway!) we
may use the Elevator very very easy!
- It should just stop the sinking gradually - you very definitely
must not
climb - not even a little piece !!!
- This time we want to reduce the speed gradually until stalling!
- But be gentle and patient! For a Cessna that runway is more
than 10 times longer than needed - and you will get better each time!
Have a look at real airport: Most of the landings of those high paid
pilots are not "on the dot" - but they all settle down slowly!!
- The Cessna will stall at about 45 kn
- if you are just an inch or so above ground at that time that
was a perfect landing!!
- otherwise the passengers and crew members will sue you
- and your friends have something to laugh about!!!
- Exit the runway to the right
Practice
in
the Pattern!
That
first landing probably was not the best of your lifetime (hoping that
there is some life afterward!) - so practice, practice, practice, ...:
- Taxi a little forward then you are at runway 33 again
- After you convinced yourself that nobody else is approaching, do
a short preflight prior starting:
- altimeter = altitude of airport (KOAK = 9 ft)
- runway-heading = 330° in "Heading Indicator"
- trim into "Take
Off" position
- no flaps
- Then start
- climb to 1000 ft heading according runway 33 (=330°)
- and then turn to about a heading 090 = downwind. Look for that
landmark "Flugrichtung"
- and continue as you just did
Now have fun practicing! Be aware: If you cannot do it with such a
light-weighted, fast responding aircraft -- you never will be able to
do
it
with the "Biggies" - and that even in bad weather! An Autopilot is a
wonderful thing - I love to use it myself! But do you really want to
be dependent on a machine all your life? At least once in a while you
should train your "manual, human controls" again and again.
Profi-Pilots (must!) do it constantly!
Switching Off
As good pilots (to be) we do
not just switch of the PC or the Simulator or whatever!
We do an orderly shutdown:
- Taxi to a Parkinglot or Gate or ...
- Set the parking-brake ("B“)
- Pull the throttle all the way towards you ("PgDn▼“ or mouse-wheel)
- Pull Mixture
all the way towards you and wait till the Propeller stops ("M" or mouse-wheel)
- Ignition-key to "Off“ (3 times "{“)
and do not forget
the most important thing: Some caressing units to that wonderful C172p!
(Also aircrafts do have
feelings!)