VFR Cross-Country
|

Our beloved Cessna C172p over ... ?? Does somebody recognize that airport ??
|
This tutorial simulates a cross-country flight from Reid-Hillview
(KRHV) to Livermore (KLVK) under Visual Flight Rules (VFR). Both
airports are included in the standard FlightGear package, so no
additional scenery is required. But we will be referencing many
additional, freely available data-resources which you may only use
for
simulation - for similar actions in reality you are not licensed to use
them and they may be far outdated, so they may present an actual safety
problems if used in reality!
We assume that you are happy taking off, climbing, turning, descending
and landing in FlightGear. If not, have a look into the chapters
before, especially "Solo Flight" and "KnowHow".
This VFR-tutorial is based on applying those unique skills within an actual
task, and provide informations on some of the slightly more complicated
flight systems and procedures.
We also assume that many people like to fly - but only a few of them like
the pre-planning, which may even take a longer time then the actual
flight! But we urge you to go through that complete planning-scenario
at
least once - and then decide from case to case what you want/need to
use for your own planning. Even if in future you only take flights
"under perfect weather conditions, direct GPS from A to B, and do not
care about others in the area" - you can do that in a simulator! But
wouldn't it be nice to have at least some idea about what other
pilot-friends are talking about?
Flight Planning
As we do plan each trip by car into unknown areas by checking maps
and regulations to find the best route - we surely have to do that also
for a flight.
So let's get to known the environment first:
Airports
For the whole USA lots of airport informations are available on-line,
e.g. in http://www.airnav.com.
You can directly call up any unique airfield by adding that ICAO-code
to it, e.g.: http://www.airnav.com/airport/KLVK.
You probably will be overwhelmed by all that many informations
presented
there - so learn to pick what you need. We suggest to first
concentrate onto the pictures at the right side of the homepage:
» usually there is a nice "aerial
photo"
of that airport, giving you a complete visual overview
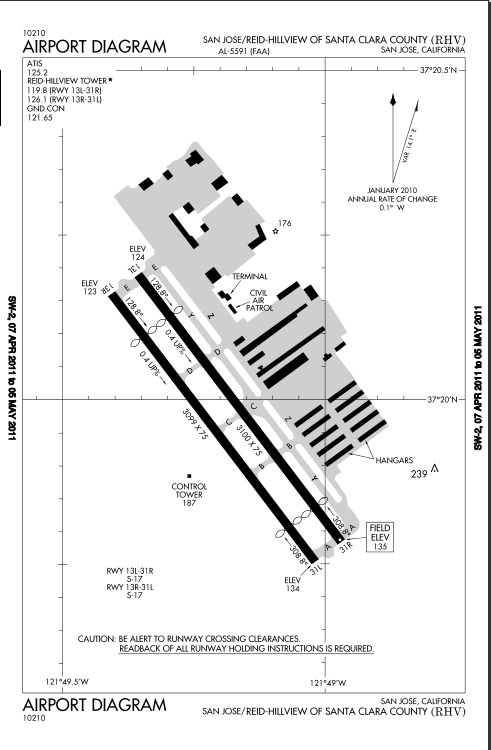
» and there is the "Airport Diagram", telling you where is what and how
to get/taxi there:
We suggest you print out at least this kind of "Airport Diagram" to be
oriented, especially if you fly in a "Multiplayer environment", may
be even with an ATC telling you
where to taxi and hold and ....
But as I said: To find that data for the whole world is a little more
complicated. We suggest you start inside the VATSIM-Organization:
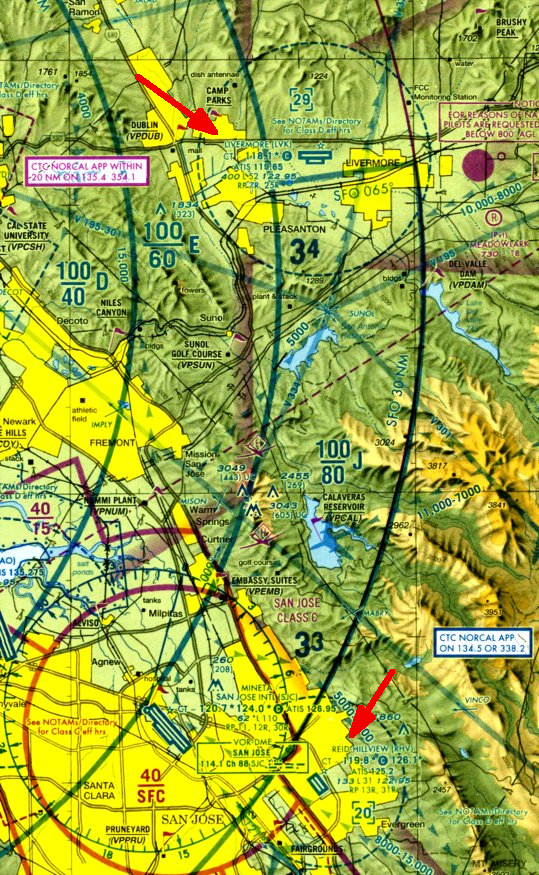
The Sectional
Have
a look at the so called Sectional for the area. This is a special map showing
airports, navigational aids, obstructions, etc.. There are two scales
of
sectionals for VFR flight - the 1:500,000 sectionals themselves, and a
number of 1:250,000 VFR Terminal Area Charts which cover particularly
busy areas.
Again a little drawback for the nonUS-simulator-pilots: Those
"Sectionals" are freely available (for
simulations!) for the whole USA in a "Google-map style
interface" in http://www.runwayfinder.com/.
The rest of the world may have to buy them - and they are expensive! So
many of you may have to use the FlightGear own resources like MPmap and/or ATLAS.
But for now we fly inside the USA and thus can use the http://www.runwayfinder.com/:
- After opening there will be an Input field at the upper top:
Enter the wanted airports (and waypoints) connected with a ";", e.g.:" krhv;klvk".
This will show you the area covering all waypoints, connected with a
straight line. Clicking onto that line gives you detailed informations
like distance, course, etc.
- Like in Google-view you find a selection-block in the upper
right part of the chart to select the wanted form of the map. I
suggest
you have a look into:
- Map: To
see where we are on a normal map
- Satellite:
To get an overview of the terrain we will be flying in
- Terrain: to
see actual heights, you can zoom into the chart to see each unique
contour-lines and thus exact altitudes
- VFR-chart
= Sectional: This is the one we will be mostly interested in for
now:
|
By the way: The Sectional is
oriented "north-south" like street maps. But you
can see the difference to the magnetic North in any VOR-circle/scale.
See e.g. VOR
"San Jose" (just left of KRHV) that has a pointer directly to 0° -
which on the cartographic
map looks like 14.2°!
Do not be confused: On US-charts you often find the ICAO-codes without
the international used leading "K". So "RHV“ = "KRHV“ and "LVK“=“KLVK“!
Let us see what (most useful) informations are offered in that
Sectional, e.g. for KRHV (see (my)
red arrow in the lower right):
REID-HILLVIEW (RHV)
Airport-name and ICAO-code (mentally add "K“ in front!)
CT – 119.8 *
© 126.1 *
CT
= there is a Control-Tower
119.8 = is the
CT-Frequency to contact ATC
* = the tower is manned
only part-time
©126.1 = the
UNICOM-frequency for pilots to inform each other about their
intentions, when the CT is not manned
ATIS 125.2
ATIS will inform about the active
runway, weather, etc. on this frequency
133 *L31 /
122.95
133
= the altitude of the airfield in ft
*L
= means lighted -- the * again means only part-time
31
= the longest runway is 31*100 = 3.100 ft. (~1 km).
122.95
= CTAF (Common Traffic Advisory Frequencies) = Military-Unicom. i.e.
this is a Military airfield!
RP 13R, 31R
RP = Right hand traffic
pattern
for runways 13R and 31R (there are no traffic-patterns for 13L
and 31L, i.e. you should not use those for VFR approaches!)
|
or use the MPmap:
|
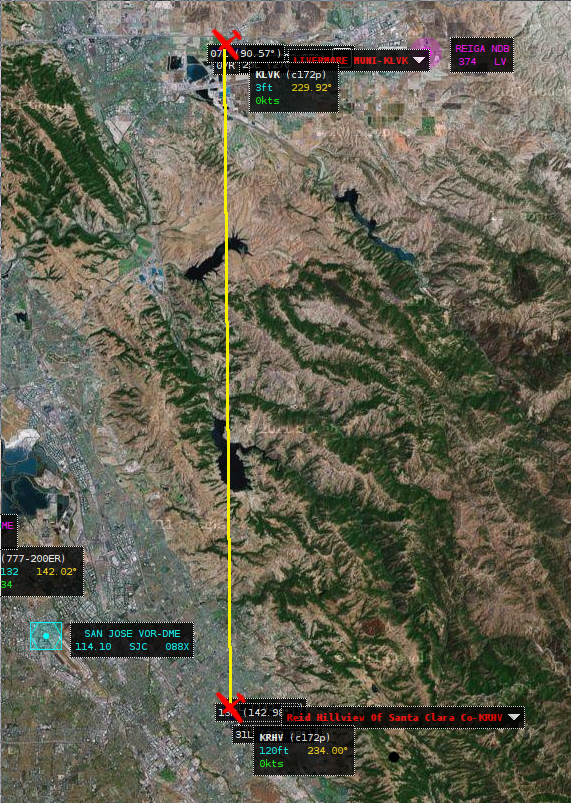
See on the left a similar
presentation on MPmap:
- See
in the left the area between those to airports, also how a NDB (REIGA)
and a VOR (San Jose) are
represented, inclusive their frequencies.
- Sorry that you cannot see the actual terrain altitudes! So
be careful, you may look for it on normal maps.

Above you see KLVK by zooming into the MPmap.
- You see the runways with their ID's and exact heading, e.g.
runway 07R (ID) has a actual heading of 90.58°. Notice this hint for a
rather big deviation between cartographic and magnetic heading!
- Also see the ILS
informations if you click onto that "cross
in a square" to the right of the runway ID 25R. We do not use ILS yet -
but You
will need it during the "IFR Cross-Country".
- And notice the difference between the cartographic/magnetic
heading of the runway: It's name says 25, so that means about 250°
(cartographic) - but in that right box you also see "270.57°" (magnetic)!
That means a big difference of 20°! See the explanation to it under the
following chapter "The Course".
- You
can also spot the taxi-ways - but not the names of them, same with the
parking lots etc.. So you are not able to follow an advise "taxi to
runway 25L via J": If you get such an advise from ATC you need to use
the Airport-Diagram: There are 2 taxiways in
parallel ("A" and "J") - and it may make sense to define which one to
take - those things will become important on bigger
airports!
For the KRHV layout on MP see the following chapter "The Start-position".
|
The Route
So, how are we going to fly from Reid-Hillview to Livermore?
We’ll be taking off at KRHV. As can be seen on the airport-diagram (as also on Sectional or MPmap),
there are two parallel
runways at KRHV. This is to handle
the large amount of traffic that uses the airport. Each of the runways
can be used in either direction. e.g. runway 31 is the same runway as
13, just from the other end! The 13 and 31 indicate that the
magnetic heading of the runways is around 130° respectively 310°
degrees, and the R/L
indicates that it is the runway on the right/left. So, the runways
available are 13R, 13L, 31R, 31L.
The
names of the runways are written in large letters at the beginning of
the runways and are
easily been seen from the air (see e.g. the picture at Starting positions)
First of all let us see from which runway to start. Of course that
depends primarily on the wind - so it could be either one of those 4:
31L/R and/or 13L/R. But remember: We saw in the Sectional
that there is no Pattern for 31L and 13R. Thus:
- 31R would be fine for taking off "Straight Out" and then just doing a little turn to head north
- 31L would not fit, because we could not turn
right and thus cross the departures from 31R! Anyhow we would need to
taxi a longer way! So why should we use it (unless ATC tells us to!).
- 13R could work, when we depart via the right hand traffic-pattern
while we continue to climb above the pattern altitude
- then at the end of downwind we would be high enough to cross the
approaches as well for 13L as 13R and head north
- 13L again is a problem because there is no pattern - so we would
have to extend our "Straight out" for a long time until we could turn
north!
To summarize: We prefer the 31R (and would take the 13R when the wind
forces us to start eastbound)!
The Course
The next big question coming up is: What will be the exact heading
towards KLVK?
Looking onto the maps we can draw a nearly perfect vertical line
between KRHV and KLVK, that would indicate a heading of 360°/0° (remember: On a compass 0° as well as 360°
are both exactly north!). We talked already about he
difference between the cartographic
heading (on normal maps)
and the magnetic heading, which we need for our compasses! Now have
another
look onto the Airport-Diagram, there you see
in a corner a
triangle of 2 arrows: The one arrow shows into the cartographic
North (0°/360°) and the other to the magnetic North - and in between is
an angle of
14.2°. You see the same on the Sectional at any VOR: See e.g. the
compass rose of the VOR "San Jose" left of KRHV: Also there you see an
"Arrow 0°" going to the map heading 14.2°. Thus
» If you fly by your compass a heading
of 0° - you actually fly on a 14.2° heading over the earth (maps)
» so, to actually fly North according to the map (as we want to) we need to fly 360°-14.2° =
345.8° !!
So once we took off we’ll head at about 346° towards Livermore (KLVK).
We’ll fly at about 3,500 ft about sea-level. This puts us at least 500
ft
above any terrain or obstructions like radio masts on the way. You may
verify that on the Sectional, selection "Terrain": There are several mountains
with about 3000 ft around the "Calaveras Reservoir".
We’ll fly over the Calaveras Reservoir and then the San Antonio
Reservoir.
These are both large bodies of water and we can use them as navigation
aids to ensure we are on the right track.
Once we get about 10 miles out of Livermore (above the San Antonia
Reservoir), we’ll contact the Livermore Air Traffic Control (ATC) to
find out where we should land. We’ll then join the circuit and land.
The
Start-position
 If you
fly by yourself you could just pop up on the Starting point of the
runway. But if you fly with the Multiplayer-Functions activated
you should never do that, because you do not know if there is
somebody on short final to it or getting ready to start or ... or ...!
In all
those cases you are suddenly "inside" the other players - which is not
really appreciated by anyone! You may hear (or read) some pretty nasty
words! So let us learn how to avoid that and do what is done in
reality. Remember in Section "Solo Flight" we did do that already by
defining a "Parking position" to start at. For KRHV there are no such
"--parkpos" pre-defined (yet) - but we can define easily our own,
private,
VIP parking position (without having
to pay any rent for it!) - let us do that! There are 2 easy ways
for it: If you
fly by yourself you could just pop up on the Starting point of the
runway. But if you fly with the Multiplayer-Functions activated
you should never do that, because you do not know if there is
somebody on short final to it or getting ready to start or ... or ...!
In all
those cases you are suddenly "inside" the other players - which is not
really appreciated by anyone! You may hear (or read) some pretty nasty
words! So let us learn how to avoid that and do what is done in
reality. Remember in Section "Solo Flight" we did do that already by
defining a "Parking position" to start at. For KRHV there are no such
"--parkpos" pre-defined (yet) - but we can define easily our own,
private,
VIP parking position (without having
to pay any rent for it!) - let us do that! There are 2 easy ways
for it:
- Open
MPmap and zoom into KRHV, about like shown on the left. Get your
mouse-pointer to any place you want to use as startup-position - e.g.
as
shown at the aircraft-symbol "jomo". The GPS
data will be shown on the
top right corner on the screen. In addition we need a heading: In the
shown case we are lined up with
the runway 31R, which would be roughly 310°+14°
(magnetic/cartographic!) = 324°.
- Or you can just fly to and land on that airport and taxi to
a parking-lot you like. Then open the Menu
→ File
→ Browse
Internal Properties → position and read the "latitude-deg"
and "longitude-deg". The heading you can read directly from your compass!
If you start with FGrun you enter
these values in "Advanced
→
Initial Position"
Otherwise add these data to your Options-file:
--lat=37.334047
--lon=-121.816320 --heading=324.
If you then show up at KSFO -
you know you mistyped something, because FlightGear did not accept your
definition and thus placed you onto the default airport KSFO!
|
Let me warn you about the correctness
of all maps: When taxiing on KRHV you will notice, that not everything
looks like it should according to the map. Sorry about that: But our
"Scenery-Architects" are working unpaid, are overloaded - and will
correct those things ASAP (As
Soon As Possible)! In KLVK
that effects especially the taxiways and markings for them - we will
point out those in the following, when we hit an error!
Start Up Engines
You know already how to start FlightGear
in all possible ways, so I will not bother you with that. Just let us
make sure we all start from runway 31R at KRHV and land on 25R at KLVK,
at
least for our first try. So please add the options:
» "--wind=270@5"
to your Option-File if starting without FGRUN
» or define the wind in FGRUN → Advanced → Weather:
Set "Heading=270" and "Speed=5"
then start as usual.
So
now we are sitting in our beloved Cessna and prepare for Startup. I
hope you
have already a little "every day checklist" from our trainings before -
so we will point out here only some unique settings:
- Time: At
least for our first exercise we want to be sure to have daylight to see
everything, so
- FlightGear
Menu → Environment → Time Settings → Noon → Close
- Weather: At
least for our first exercise we want to have beautiful weather, so we
can concentrate onto the lesson:
- FlightGear
Menu → Environment
→ Global Weather → (click
the ▲ at the right of the yellow field "METAR Source" and choose)
Fair
weather → OK
- Parking
Brake: Make sure it is set
- Look underneath the pilot's yoke: That handle should be
vertical (click onto it (or type "B") and you will
see the difference)
- Your ID: In the
following we may also communicate with the AI-ATC. But this AI the system does not (yet?) use the same ID as for the
Multiplayer settings. So we better define our ID here to be sure we
notice it if an AI-ATC is talking to us! We can do that in 2 ways:
- you can define it (right now) in the "Internal Properties":
- select: menu →
Debug → Browse Internal Properties → sim →
user
- click onto "call-sign“
- and enter the wanted ID into the yellow input-line at the
bottom
- close the window by clicking onto the little square in the
most upper right corner of that menu
- or as a permanent option
- in FGrun: Advanced
→ Properties:
/sim/user/call-sign=YourCode
- in an Option File insert:
--prop:/sim/user/callsign=YourCode
- Engine: If
the engine
is not started yet type "s" (or see the
detailed procedure in "Engine Control")
- Also in reality you would start the engine at that point in the
procedure
- because we now need power/electricity for our instruments
- and out of the "good old days" we want to have all
instruments and radios OFF prior to get into initiation or sparking
problems!
- Radio: There
are many ways to find the frequencies for the airports etc. Some
examples are:
- in MPmap click onto
the little white triangle at the right side of the airport-name and
select "atc"
- or take it from the "Sectional"
(watch it: Not all shown
frequencies may be available in FlightGear!)
- or look into the Airport-Diagram (watch it: Not all shown frequencies may
be available in FlightGear!)
- if you have FGCOM installed look into the phonebook.txt in
its directory - that one is
the best choice if you want to use FGCOM!
- If You want to save time you
may have a look to chapter "Setting
the Radio" - there is shown (as an example) how to set all
frequencies needed for this flight, and also for the IFR-Cross-Country we will do later!
- Altimeter: Do
not forget to set it to the airfield elevation now: 133 ft (Remember that little black
dial at the bottom of the altimeter?)
- ref. the "Sectional"
- or click in MPmap
onto the little white triangle at the right side of the airport-name
and
select "info"
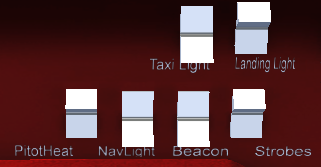
- Check your
lights: You may remove the Yoke to get better access: Menu
→ Cessna C172P → Show/hide yoke -- do not forget to "Show" it
again after the check!
See the switches in the position we do want now: Taxi, Navi, and Beacon
on - all other off
(You may choose to switch "PitotHeat"
on on very cold days!)
Landing-light and Strobes will be switched on after "cleared to Take
Off"
(For more Infos see The description of the
Instruments)
Ready
to Taxi
We are
already "Professionals" in taxiing to a runway and taking off (if not: Revisit "Solo
Flight" and "Know How") - so
let us just explain the unique things here:
 First
of all: At the beginning we did set a special "fair weather"
which probably enables us to start from runway 31R. But I do hope, that
in some further training flights you will use "live data"
or even some more difficult choices instead of this (boring!) "fair
weather"! And maybe some time you have an ATC
controlling you or you depend on the UNICOM. So we will try to describe
also these different possibilities. First
of all: At the beginning we did set a special "fair weather"
which probably enables us to start from runway 31R. But I do hope, that
in some further training flights you will use "live data"
or even some more difficult choices instead of this (boring!) "fair
weather"! And maybe some time you have an ATC
controlling you or you depend on the UNICOM. So we will try to describe
also these different possibilities.
The runways at KRHV are 3000 ft in length, so that we always could
start
"intermediate" from the center of the runway - as shown in the Sketch.
Especially because I do not want to taxi more than needed, we will use
that "intermediate procedure" as describe in the following. That is also
good for doing some "Short Field Takeoff" training!
According to the pictures we first need to taxi a little left ahead to
enter
the center taxiway, that crosses all runways at their center (ref.
the Sketch). Also see the yellow signs for the taxiways and the red signs for the runways!
|
In the following we will also exercise the normal communication
parallel to what we are doing. (Do
you remember your (car) driver lessons? It is not so important what you
do - but let the others know about it!) We will do all the
communication by
using the numbered codes of the "Chat Menu" - that way we save
a lot of typing. (In
case you use FGCOM I suggest you send the messages first and then read
them from your screen loud into your microphone - so you get used
to the wordings, and thus all pilots in the area read/hear your
announcements even if they do not use FGCOM or are on another
frequency!)
If there is no "human ATC" in the tower you can decide by yourself if
you want to use the UNICOM - or the ATC-Procedures, the differences are:
» with ATC we
request a clearance for what we want to do and then wait for the tower
to "clear" us. Those codes begin with "-3.." (or
" '3.." on
egl. keyboards)
» with UNICOM we
announce what we are going to do -- and watch out that others are not
endangered by our doing! Those codes begin with "-2.." (or
" '2.." on
egl. keyboards)
(In the following I will write all
codes in the international way with "-" at the beginning, because that is easier
to spot than the engl. "'"!)
Make sure the tower frequency 119.8
is set into COM1 !! (hit
"F12" to check)
- Start Taxiing:
- "-366" with
ATC:
- "KRHV YourName
ready to taxi, VFR North"
- ATC will define the runway in his response
- "-222" with
UNICOM:
- "KRHV YourName
taxiing to runway ..."
- Then we start taxiing onto that center taxiway which crosses
both
runways half way. According to the "Airport Diagram"
we are using the taxiway "C", crossing "Z" and "Y", and holding
short of RW-31R!
- Here we have a little scenery-problem (that may have been corrected already when
you
read this!): The sign for 31R is actually placed at
"taxiway Y", and
the sign for 31L is placed at 31R. So just hold short before crossing
the first runway - and you are OK!
Attention:
You are never never never ... allowed to cross any runway without stopping before it
first!
- If you are like me (not really tall etc.) you might lose the
orientation while taxiing - so
- I allow you (and me) to use "v"/"V" to jump
in/out the cabin and see everything from a higher position
- and you may use "h" to open the
HUD in order to read the low ground-speed. You should stay well below
20kn (in turns max 10 kn)
- Holding
short before runway 31R
- we now have two options to continue:
- for 31R we can enter the runway here, to TakeOff "Straight
Out" and then go on course
- for 13R we need to go into the pattern, continue to climb and
go on course at the end of the pattern
Thus we do have to go different from
here, see the following procedures:
|
TakeOff from 31R: (Wind from NW)
|
TakeOff from 13R: (Wind from SE)
|
- "-347"
with ATC:
- "KRHV YourName
holding short runway 31R"
- ATC will advise you to enter the runway and get ready (or
TakeOff )
- switch on "Landing Light" + "Strobes"
- "-225"
with UNICOM:
- "KRHV YourName
departing runway 31R,
departing the Pattern to the North"
- switch on "Landing Light" + "Strobes"
- and after you convinced yourself that nobody is on final
etc, you enter the runway and depart.
|
- "-347"
with ATC:
- "KRHV YourName
holding short runway 31R"
- if there is a "Human ATC" at work he will clear you to
cross 31R - if not that may not yet be implemented (try it)
- "-221"
with UNICOM:
- "KRHV YourName
taxiing to runway 13R"
- and after you convinced yourself that nobody is on final
etc, you cross runway 31R and next hold short at runway 13R.
- and there we stop again and ...
|
|
- "-347"
with ATC:
- "KRHV YourName
holding short runway 13R"
- ATC will advise you to enter the runway and get ready (or
TakeOff )
- switch on "Landing Light" + "Strobes"
- "-225"
with UNICOM:
- "KRHV YourName
departing runway 13R, departing the
Pattern to the North"
- switch on "Landing Light" + "Strobes"
- and after you convinced yourselves that nobody is on final
etc, you enter the runway and depart.
|
Climb straight at runway-heading
(310°):
• at altitude 1000 ft turn right to our course (346°)
• and continue to climb to 3500 ft
|
We enter the pattern
and continue to climb in the pattern:
• climb straight at runway-heading (130°)
• at altitude 500 ft turn right to Crosswind (220°)
• at altitude 1000 ft another 90° to the right (310°)
• at the end of Downwind we turn right to our course (346°)
• and continue to climb to 3500 ft |
Climbing:
 After
we are on course (346°) we should see in some distance a dominant
valley, that we can use as a visual target to fly towards. Coming
close we will spot the first large lake, the "Calaveras Reservoir"! As
we said before: This is
a very welcomed and easy to spot landmark for verifying that we are on
the right track! Over the lake we should have reached our cruising
altitude of 3500 ft! After
we are on course (346°) we should see in some distance a dominant
valley, that we can use as a visual target to fly towards. Coming
close we will spot the first large lake, the "Calaveras Reservoir"! As
we said before: This is
a very welcomed and easy to spot landmark for verifying that we are on
the right track! Over the lake we should have reached our cruising
altitude of 3500 ft!
You might remember, that in analyzing the route, we had a straight line
over 2 lakes - this is the first of them. But when you started as
described, you are probable not exactly over the center of the lake - but a
little to the left of it. That is because we did not directly go on course
346° at KRHV, but first headed some time for 310° or we even first flew
a pattern -- all that puts us further northwest than the direct line
KRHV/KLVK is showing. But now we have the chance to correct for that:
We should fly over the center of the lake - so change your heading to
get over the center of the lake and from there head again on 346°!
You should always expect such deviations from your course, may it be as
described just before, or due to wind, or because we did not pay enough
attention to our instruments or whatever! So always make sure you have
some landmarks at which you can double-check! That is why this flying
technique is called VFR (Visual
Flight Rules - NOT compass-rules).
Yes - I agree: This little trip could have been done without it - but
on a long trip you would not be the first guy getting completely lost -
also outside deserts or similar! So you better learn the basics here and now!
|
Cruising with George
After
we have trimmed our Darling Cessna (at
3500ft, hdg. 346°, speed ~120 kn
at ~2500 RPM) we can try to relax a little and get our "Servant"
to
work - also known as "George" or "AP". See the
chapter "AutoPilot"
for a description of all his/it's abilities and how to handle it. On
this
flight we will just use him/it for keeping the heading (HDG) and
altitude (ALT).
As soon as we tell "George" to take over he will do so
very eagerly - and sometimes you might be surprised how well (and blind
and stupid)! This servant will follow your orders without any
intelligence - he will even follow orders of which you have no idea that you
gave them! So make sure what orders you may have given him before telling
him to take control! George will immediately take over two controls:
- ROL:
George will use the ailerons to level the wings and keep them leveled
immediately!
He does not care at all about heading or course or whatever - he just
keeps the wings leveled - and he will fight against you very strongly
if
you would dare to move the ailerons just a tiny bit
-- the ailerons are now "Gorges" responsibility and he will fight for
it
- until you give him explicitly other orders! And giving "orders" is
not just "Hey George I make a little turn", but
- make sure
the Heading marker (the
little red marker in your "Heading Indicator") is set to the
heading you like (now 346°)
- then you tell George to follow
that heading defined by the "heading marker" by pushing the button "HDG"
- and then you can change that "heading marker" as you want - and
George will follow that change immediately!
- A little Warning:
George is stupidly trying to react as fast as possible. So if e.g. you
are flying 360° and want to make a turn to 090°
Gorge will do that very nicely - turning immediately to the right. But
if e.g. on the right there is a big mountain (or ATC asked for "left"),
then you may want to make that turn to the left - but George will never
understand that: He will always try to turn the shortest way, and that
is to the right (only 90° turn instead of 270° via left!). So you have
to trick him by using 2 stages: Tell him first to turn to e.g. 200° and
shortly before he is there tell him to turn to 090°! The turn-order to George must always be
smaller 180° if you do need a certain turn-direction!
If
you want to have a little fun: Try to tell
George to turn left by moving the red marker counter-clockwise to 090° FAST
- then George will immediately start turning to the left - but as soon
as the angle between the current heading and the red-marker becomes
larger
then 180° he suddenly will reverse and turn into the other direction!
That is how stupid he is - we are lucky to have an intelligent pilot
watching George!
- VS (Vertical Speed): George
will continue to ascent/descend as is - so watch it if you give that
control to George: If you do it while descending, George will
continue to descend until you crash - or tell him otherwise!
- You may tell him what to do by using the "UP"/"DN"
buttons. With those buttons you define the FPM (feet per minute) with
which you want to ascent/descent!
- Normal values would be around 500 to 750!
Caution: The
AP uses the trimming functions to control. Thus those may be messed up
pretty much and may even crash you when Taking Off again after an
AP-Approach - and you forget to set trimming to "neutral" again! But
also if you just switch off the AP during flight the
trimmings may not be what you would expect when switching the AP back
on again!
Clever as you are, by now you probably get a wonderful idea: "I will
just
get the wheels off the ground, initiate a climb and then switch AP"!
Well - hhhmmm - yes - it will work (most of the times!!) - but please: Do not! There
are 3 big reasons
for not doing it:
- Safety:
In case anything goes wrong during the TakeOff you will smash onto
ground before being able to switch off the AP and take over again!
- Reliability:
You should remember that you are controlling the ascent and heading
with
the Yoke (i.e. Elevator, Rudder, etc.) while the AP uses only the
trimming-functions. So, if you have not trimmed to your actual attitude
yet, the AP will have big problems and needs a lot of time finding the
correct trimming! You always should trim first manually (at least
roughly) before activating the AP! Or you are never sure what will
happen! For sure it will not be a smooth transient, if you just let
George take over - he really is dammed stupid (although he is a
wonderful piece of clever engineering!)!
- Proficiency:
After you have trimmed for cruise there is not much to "fly" for you
any more. So you will forget what flying is all about - so use these
TakeOff's to keep up your feelings, reflexes,
etc. etc.
You tell George to stop controlling by pushing AP a second time. And
here is one of the problems: George will not stop immediately - he
first
will start flashing the display to warn you - and will withdraw only
after some time! So do not expect immediate actions - if you are on AP
you have to trust that "non intelligent" servant for some time! Be sure
not to hit a sudden emergency! As soon as you believe it could become critical
- you better take over control immediately! (Yes: In reality all Pilots do have an extra switch at there yoke to switch the AP off immediately - but not you!)
If you restart the AP during the same session - it will restart with
the values it had before! So be careful if you just mad a Touch&Go
or took a rest at some airport in between. Switching on the AP will
be OK for ROL and VS -- everything else you should double-check prior
to
activate it !
So let George be our servant now: We switch him on by a click onto "AP"

|
After switching on "ROL" and "VS" will be
active!
That means the wings will stay horizontally leveled and the actual
ascent/descent will be continued!
See the "0400" in the upper right corner: That means we were
climbing with 400 ft when switching on. George will continue to get us
up until we stall due to the engine stopped (because the Mixture was not adjusted by you) - or till we tell George
to do
something different!
|

|
By now we have clicked onto "HDG" and "ALT" - that
means George will follow the red heading bug (wherever that points to)
and keep the altitude we are at now.
To change the present altitude we could push "ALT" (i.e. "VS" gets
active
again) and then we define with the "UP"/"DN" in what direction we
ascent/descent and how fast. When crossing the wanted
altitude, we push "ALT" again - so we stay there!
|
 |
This
is a typical indication when we descent during approach: We sink with
about 500 ft/Min and follow the direction the red heading bug points to.
To level of at a certain altitude (e.g. Pattern = 1400 ft) hit "ALT"
when crossing that.
To change the heading just move the red heading bug.
|
But even if you can trust George in general - keep monitoring him!
Especially for:
- Altitude and
Speed and Fuel: George will not adjust speed, RPM,
AoA, tanks, etc.
- Mixture: George
does not care about the mixture at all. If you
tell him to climb to 12,000 ft he will do his best - but you probably
crash somewhere above 7000 ft because the engine stopped. (see Mixture)
- Landmarks/Waypoints:
At best you set yourself a timer for when the
next waypoint is to be expected!
And do not forget: Enjoy that wonderful landscape below you!
The
Approach
Once
you reach the second reservoir (the San Antonio Reservoir), we need to
start planning our descent and landing at Livermore. Landing is a lot
more complicated than taking off, assuming you want to get down in one
piece, so you may want to pause the simulator (press ‘p’) while reading
this. But do not use the "p" when flying in "multiplayer mode"
and/or flying in an group: Because you become invisible after a short
while in "pause-mode"! Especially ATC may become mad if you do that -
because that may throw all his planning - he even might lose a lot of
time trying to find you again or checking for technical problems on his side!
In
the Real World, we’d have been in contact with Air Traffic Control
(ATC) continually, as the "Bay Area" is quite congested in the air as
well as on the ground. ATC would probably provide us with a ‘flight
following’ service, and would
continually warn us about air-traffic around us, helping to avoid any
possible collisions. The FlightGear skies are generally clear of
traffic, so we don’t need a flight following service.
If you fly in "multiplayer mode"
you also might open the "Pilot List" in menu
→ Multiplayer
to see who else is flying in your area, and where he/she is flying.
Livermore Airport is towered (towered airports are drawn in blue on the
sectional!), so we will need to communicate with the tower to receive
instructions on how and where to land.
Before that, we should listen to the ATIS, and re-adjust our altimeter,
just in case anything has changed. This is quite unlikely on such a
short flight, but if flying hundreds of miles it might make a
big difference. To save time when tuning radios, you can access the
Radio
Settings dialog via "F12". The
Livermore ATIS frequency
is 119.65
MHz.
An ATIS message also has a
phonetic letter (Alpha, Bravo, . . . Zulu)
to identify the message. This phonetic is changed each time the
recorded message is updated. When first contacting a tower, the pilot
mentions the identifier, so
the tower can double-check the pilot has up to date informations.
Besides the altitude and weather information, the ATIS will also say
which runway is in use. This is useful for planning our landing.
Normally, due to the prevalent westerly wind, Livermore has runways 25R
and 25L in use.
Once you’ve gotten the ATIS, tune the radio to Livermore Tower. The
frequency is 118.1
MHz. Depending on the
level of AI-traffic, that you have
configured on your system, you may see/hear Livermore Tower "talking" to
other aircraft that are landing or departing. But his information is not
played over the speakers (unless you use a TTS-system), it is only displayed on the screen.
Once the frequency goes quiet, use the "Chat Menu" as we did during
departure:
- "-333"
with ATC:
- "KLVK YourName at
3500 ft 8 mi south, inbound for visual approach"
- ATC will hopefully answer: “YourName,
Livermore Tower, Report left downwind runway two five right.”
- "-23"
with UNICOM:
- "KLVK UNICOM YourName
8 mi south descending through 3500, inbound to enter traffic pattern"
- and then you watch for other traffic.
Because we did manipulate the weather, we are pretty sure that it will
be the 25R - but when you later fly under
different weather conditions that may be different. Anyhow: The 25R (or
07L) has the most difficult approach - so I will describe that one.
The others will then be self-explanatory!
Merge into the pattern
We now have
to get to "Downwind 25R"! By now we should know what a "Traffic Pattern" is - if
not: Have another look into the whole chapter about Approaches.
- The very nice thing about the 25R is, that it has a wonderful
long
runway and in addition does have all the electrical "nice to haves"!
- The bad thing is, that we have to get to the other side of the
airport, but you are not allowed to just cross the airport. You need to
stay outside the control zone!
 In
the picture on the left you see the 2 parallel runways (25R/07L and
25L/07R), of which the
one to the south is a short one - which we hopefully never have to
use! In
the picture on the left you see the 2 parallel runways (25R/07L and
25L/07R), of which the
one to the south is a short one - which we hopefully never have to
use!
And we know the procedure: We have to enter the downwind in an angle of
45°. The
merging point is somewhat indifferent: The USA say in the middle of the
downwind, Europe says at the beginning -- so let us compromise and say
somewhere between the beginning and the middle of the downwind!
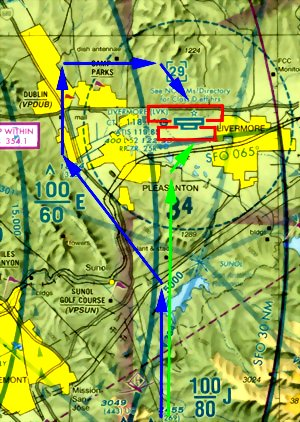
If we had to go to 07L/R we would take the green route to enter the pattern, but for 25R (or 25L) we have to take the
longer blue route, around the Control-Zone!
We
will approach the pattern from about 1 mile north of the
downwind-leg in order to first orient ourself and look for other traffic before
we join the "circus"! If you look onto the sketch you see a
highway going past the KLVK runways, just below the downwind-leg
for 25R, so we will stay about 1 mi north of that highway and then join
into
the downwind from there at the required angel of 45°!
Also notice the elevation of 400 ft for the airfield - thus the
Pattern altitude is 400+1000=1400. (It
could also be 200 ft less - but
I prefer a little higher altitude!).
|
Right now we should be over the second big water, the "San Antonia
Reservoir", heading north (346°) at 3500ft with a speed of ~120 kn
at ~2500 RPM.
Starting from there:
- We will turn about 30° to the left. Just use the dial
button at the lower right corner of the"Heading Indicator" to move the
red marker to the new heading (~320°). We are on VFR,
so we do not just set the heading to any fixed value - we will adjust
the heading so that we
- follow that highway parallel to the river in the valley to our
left
- leading us to Dublin,
- while keeping Pleasanton on our right.
- You see on the map above, that that street keeps us just
outside the Control-Zone (the dotted circle around KLVK)!
- With the nice weather (that we
mixed ourself at the beginning!)
you should be able to see the airport already far to the right. When we
are in one line with the virtual centerline of the runways (or
just getting near the highway crossing at
Dublin) we need to watch the traffic departing from KLVK. And be
careful: Those departing aircrafts are not easy to spot! They will be
at or above the pattern altitude (a
departing Cessna at this point will have an altitude of ~1500 ft, other
aircraft may be a little higher) so we will try to be at pattern
altitude already here (1400 ft).
- So it is already high time to start our descent. You know already
how to
do that from prior lessons. This time we let George do it (based
on our
commands and responsibility!):
- before we descent let us make sure we do not get problems with
the engine, so
- push in the Mixture lever to
"full fat"
- pull out the "Carburator Heat"
to be sure we do not get any icing (in cold, moisture air)!
- Now advise George what to:
- push "ALT"
to switch from "ALT"-mode to "VS" mode
- push "DN" as often as
needed to get the indication
"-500".
Watch especially that there is a "minus" sign if
front of the 500!
- and down we go! (If we started the descent a little
late we may use a somewhat higher descent rate (e.g. up to 800 FPM).
- Reduce the RPM to about 2000, otherwise
we may over-speed now, because that stupid George does not coordinate
airspeed and descent/ascent!
- Look to the right: You should be able to spot KLVK! Start
looking for departing traffic! If you are in Multiplayer-mode you may
get support from:
- the "Pilot List" (menu → Multiplayer → Pilot List):
Look for Pilots being in "brg" of about 090°.
- the "Map" (Menu-bar
→ Equipment → Map):
Click onto "Traffic" to see the targets as little black rhombi. Roll
the mouse-wheel to zoom in/out. You yourself are the yellow target!
- So we should be down to 1400 ft just before the big
highway-crossing at DUBLIN - there we level of again:
- push "ALT"
to switch back to "Altitude hold" as soon as the altimeter-needle reaches the 1400 ft.
- increase the RPM
again to 2500
- let George do his fantastic trimming job!
- About 1 mi after the crossing we will turn right to the downwind heading 075°. Actually
the Airport-Diagram say 25R=256.4°, but for
VFR 255° (thus downwind 075°) will be good enough:
- turn the red heading marker to 075°
- that will get us a little (~1 mi) north of the east-west
highway
parallel to the runway:
- and let George take care of it!
- After we are on course (or a little later) it is time to reduce
the speed to join into the downwind leg nicely trimmed at ~70 kn (the
rest
down to 60 kn will be done later by the flaps!). We did that
already many
times - and George is perfect in doing such things - so we will use
George for that:
- just reduce the RPM to ~2000 -
that will bring the speed to the white area of the Flap-marking in the
airspeed indicator
- watch it:
The RPM may vary while we fly in constantly changing attitudes - so
keep
it near the 2000!
- when in the white area set the Flaps to stage 1 ("]").
- Look to the right: The airport should be about 45° to us (that
probably is shortly before that hill coming towards us - a nice
landmark to turn and
follow!):
- look out
for traffic on the airport and in the pattern (otherwise you may turn LEFT 270° and then
again to 90° - for a little waiting circle!)
- turn right 45°, now heading to the beginning
(or center) of the runway
- over the highway turn left to the downwind heading
again (070°)
and follow the street
- And now it is time to thank George for his wonderful services
and switch him off
- push "AP"
- George will warn us for a little while by flashing the
display and then go to sleep
- and we can proof how good George was: Take the hands of the
yoke and pedals: Our Cessna will be leveled and stable - thank you
George! (do not do that when there are gusting winds!
Landing
- Let us tell the people that we are coming (give them time to
roll out the red carpet!)
- "-333"
with ATC:
- "KLVK YourName at
1400 ft 8 mi south, inbound for visual approach" (Right now there is no msg. for reporting
"Downwind!)
- ATC will hopefully answer: “YourName,
Livermore Tower, Clear to land 25R.”
- "KLVK UNICOM YourName
downwind for runway 25R"
- and then you watch for other traffic and go on landing as
usual
- The red marker will now be at the top, when turning to base it
will be left, and on final completely down! Nice to remember when it is
getting busy now!
- As usual we will turn base when the airport is about 45° behind
us and start descending:
- set Flaps
stage 2
- reduce RPM
to 1500
- that should give as a descent of about 500 FPM
- only for UNICOM: Report "-26" for
base
- look out to the runway to decide when to turn final:
- On final
- speed
should be stable at ~65 kn
- reduce/increase the descent with the RPM only!
(typically between 1500 and 1800)
- line up with the runway
- at about 500 ft (100 ft above runway) set Flaps Stage 3
- and
flare out with the elevator -- but very very shallow - you do not want
to get into an up and down!! Remember you have a very long runway - you
do not have to get hasty!
- do not cut
power completely before 1 inch above ground!
- Exit the runway and stop after you are "clear off runway":
- report "-29"
runway clear
- take a deep breath
- check left/right (shift plus cursor arrows)
- and taxi to parking
- switch off
- Throttle full back
- set parking-brake ("shift B")
- push "Carburetor Heat" in
- pull "Mixture" out
- switch (magnetos etc.) out completely
Congratulations -
you made it !!!
Do what all good cowboys do: Some patting to our brave, well-behaved
Cessna!
And also thanks to the originator of this flight-description: Stuart
Buchanan and his helpers:
Benno Schulenberg, Sid Boyce, Vassilii Khachaturov, James Briggs and
Joe Emmerich!
You should do this exercise more often to get some routine in it.
Especially also under different weather and times - e.g. night-flights
are very nice too!